
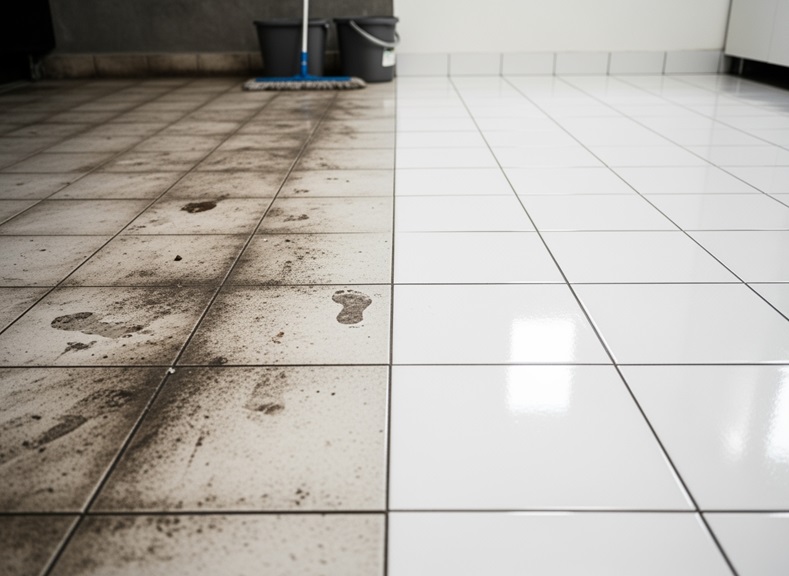
Introduction: Why Your Grout is a Magnet for Grime
Is your tile grout looking less than pristine? We understand how easily grout can become stained and discolored over time. It’s not just about appearances; grout is a porous material that traps dirt, grime, and even allergens. Keeping your grout clean is key to a healthy home and to protecting your tile investment. In this how-to guide, we will walk you through everything you need to know. We will cover the best DIY methods, essential tools, and top commercial cleaners. We will also look at when it’s best to call in the professionals. Get ready to transform your floors and showers. Grout, the material that fills the spaces between your tiles, is inherently porous. This means it has tiny openings and channels that act like a sponge, readily absorbing liquids, dirt, and microscopic particles. Over time, these absorbed substances accumulate, leading to the unsightly discoloration we often see. From spilled coffee in the kitchen to soap scum in the shower, and everyday foot traffic across floors, grout acts as a magnet for grime. Beyond aesthetics, this absorption capacity poses a significant health concern. Grout can become a breeding ground for bacteria, mold, and mildew, especially in damp environments like bathrooms and kitchens. These microorganisms can contribute to unpleasant odors and potentially impact indoor air quality. Moreover, the dirt and dust trapped within grout lines contribute to the overall allergen load in your home. Consider that the average home collects up to 40 lbs of dirt, dust, and allergens each year, much of which can settle into these porous surfaces. Regularly cleaning your grout isn’t just about making your home look better; it’s about creating a healthier living environment. Understanding this fundamental characteristic of grout is the first step toward effectively deep cleaning and maintaining it.
Gearing Up: Essential Tools and Supplies for Grout Cleaning
Before starting your deep grout-cleaning journey, gather the right tools and supplies. Having everything at hand will not only make the process more efficient but also ensure your safety and the effectiveness of your cleaning efforts.
Here’s a comprehensive list of what you’ll need:
- Stiff-Bristled Grout Brush: This is arguably the most important tool. A dedicated grout brush with stiff, durable bristles is designed to penetrate the grout lines and dislodge embedded dirt without damaging the tile surface. While an old toothbrush can work for small, intricate areas, it’s often too slow and less effective for larger spaces. For large areas, consider an OXO Good Grips Grout Brush, designed for effective scrubbing.
- Microfiber Cloths: Essential for wiping away cleaning solutions, rinsing, and drying surfaces. Microfiber is highly absorbent and effective at picking up grime.
- Spray Bottle: Handy for applying DIY cleaning solutions evenly onto grout lines.
- Bucket: You’ll need at least one, preferably two. One for your cleaning solution and another for clean rinse water. This prevents you from spreading dirty water back onto your freshly cleaned surfaces.
- Protective Gloves: Essential to protect your hands from harsh chemicals and prolonged exposure to water.
- Safety Glasses: Protect your eyes from splashes, especially when working with commercial cleaners or when scrubbing vigorously.
- Knee Pads: Deep grout cleaning often involves a lot of kneeling. Knee pads can help prevent discomfort and pain.
- Vacuum or Broom: To remove loose dirt and debris before wet cleaning. A dust mop or microfiber mop can also be effective for initial dry cleaning.
- Wet/Dry Vacuum (Optional but Recommended): For larger areas, a damp/dry vacuum can significantly speed up cleanup by efficiently sucking up dirty water and cleaning solutions, preventing them from settling back into the grout.
- Power Scrubbers (Optional): For those seeking to reduce manual labor, tools like The Drill Brush, which attaches to your cordless drill, can turn it into a powerful grout-blasting machine. For even larger areas, orbital scrub brushes like the Oreck Orbiter Machine can make quick work of neglected floors. These tools offer mechanical assistance, making the scrubbing process less strenuous.
- Steam Cleaners (Optional): Handheld steam cleaners or larger steam mops can be excellent for chemical-free cleaning, using high-temperature steam to loosen dirt and sanitize grout. They are particularly useful for those who prefer to avoid chemical solutions.
Having these items ready will set you up for a successful, less strenuous deep grout-cleaning experience, allowing you to tackle even the toughest grime with confidence. For tough jobs, consider a Deep grout cleaning by COIT to restore your floors ‘ appearance and hygiene. It’s an investment in the longevity and beauty of your tiled surfaces, ensuring they look their best and contribute to a cleaner, healthier home.
The DIY Approach: Effective Homemade Grout Cleaning Solutions
For many homeowners, the first line of defense against dirty grout is often a DIY solution. These homemade cleaners are not only cost-effective but also use ingredients you likely already have at home. When used correctly, they can be remarkably effective at restoring your grout’s appearance.
The Champion Combo: Baking Soda and Hydrogen Peroxide
Among the various DIY methods, the combination of baking soda and hydrogen peroxide consistently stands out as a highly effective, satisfying solution for deep-cleaning grout. This dynamic duo creates a powerful cleaning agent that tackles grime and brightens grout without the harshness of bleach.
Why it works: Baking soda is a mild abrasive and a natural deodorizer. When combined with hydrogen peroxide, it creates an oxygen-releasing reaction that helps lift stains and dirt from the porous grout. The fizzing action isn’t just for show; it actively breaks down grime.
Step-by-step guide:
- Prepare the Paste: In a small bowl, mix two parts baking soda with one part hydrogen peroxide. For example, if you use 1 cup of baking soda, add 1/2 cup of hydrogen peroxide. Stir until you form a thick, foamy paste. The mixture should sizzle slightly, indicating the chemical reaction is taking place. If it’s too thin, add more baking soda; if too thick, a tiny bit more hydrogen peroxide.
- Apply to Grout: Generously apply the paste directly onto the grout lines you wish to clean. You can use an old spoon, a small spatula, or even your gloved fingers to spread it. Ensure the grout is thoroughly covered.
- Let it Sit: Allow the paste to sit on the grout for 10-15 minutes. For heavily stained areas, you might extend this to 30 minutes. This dwell time is crucial for the hydrogen peroxide to work its magic and for the baking soda to soften the grime.
- Scrubbing Technique: After the dwell time, use your stiff-bristle grout brush to scrub the grout lines. You’ll notice the dirt and grime lifting away. Work in small sections to maintain focus and ensure thorough scrubbing. Apply firm, consistent pressure.
- Rinsing: Once you’ve scrubbed a section, wipe away the paste and loosened dirt with a damp microfiber cloth. For larger areas, you might use a mop with clean water and frequently rinse the mop head. Ensure all residue is removed, as leftover baking soda can leave a white film. For best results, follow up with a final wipe down using a clean, dry microfiber cloth to absorb any remaining moisture.
This method is praised for its effectiveness in brightening even severely discolored grout, making it look significantly cleaner and fresher.
Other DIY Options and Common Mistakes to Avoid
While the baking soda and hydrogen peroxide combo is a star, other DIY methods exist, each with its own pros and cons. It’s also vital to be aware of common mistakes that can damage your grout or tile.
Other DIY Options:
- Baking Soda and Water: A simpler paste can be made with equal parts baking soda and water. While less potent than the hydrogen peroxide version, it can still offer a mild abrasive cleaning action for light dirt. Apply, scrub, and rinse as above. It’s often noted that the grout comes out “noticeably cleaner but still a bit discolored” compared to the hydrogen peroxide method.
- Vinegar Solutions: Many DIY enthusiasts turn to vinegar due to its acidic nature, which can dissolve mineral deposits and soap scum. A mixture of equal parts white vinegar and warm water can be sprayed onto grout, allowed to sit, and then scrubbed. However, a significant caution applies here: Cautions for Natural Stone: Vinegar is highly acidic and can etch or dull natural stone tiles such as marble, travertine, and limestone. It can also degrade cementitious grout over time. Therefore, avoid using vinegar on natural stone or unsealed cement-based grout.
- Effectiveness: Some users find vinegar solutions less effective at removing deep-seated dirt than other methods, resulting in only marginal differences.”
Common Mistakes to Avoid:
- Using Harsh Chemicals (Especially Bleach): While Bleach can whiten, it’s a strong oxidizer that can break down the integrity of cement-based grout, making it brittle and more susceptible to future staining. It can also discolor colored grout and erode sealants. Furthermore, mixing bleach with other cleaners (like vinegar or ammonia) can create dangerous, toxic fumes. Always read product labels carefully.
- Using Wire Brushes or Abrasive Pads: While tempting for tough stains, wire brushes or overly abrasive scrubbing pads can scratch tile surfaces and remove the top layer of grout, damaging it and making it even more porous and prone to future dirt accumulation. Stick to stiff-bristled nylon brushes.
- Improper Rinsing: Failing to rinse away cleaning solutions thoroughly can leave a sticky residue that attracts more dirt, making your grout look dirty again more quickly. It can also lead to discoloration over time. Always rinse with clean water until no suds or film remain.
- Not Testing in an Inconspicuous Area: Before applying any cleaner to your entire floor, always test it on a small, hidden section of grout and tile. This allows you to check for any adverse reactions, such as discoloration or etching.
- Neglecting Ventilation: When using any cleaning product, even DIY ones, ensure adequate ventilation by opening windows and doors. This helps dissipate fumes and keeps your cleaning environment safe.
By understanding these DIY methods and, more importantly, avoiding common pitfalls, you can effectively clean your grout and maintain the beauty of your tiled surfaces.
When to Call the Pros: An Inside Look at Albuquerque Expert Deep Grout Cleaning
While DIY methods can be effective for routine cleaning and moderate stains, there comes a point when deep-set grime, extensive areas, or specific types of grout demand professional attention. DIY efforts can be limited by the strength of available cleaners, the intensity of scrubbing power, and the sheer time and effort required. When your grout still looks dingy after your best efforts, or if you’re dealing with stubborn mold, mildew, or years of accumulated dirt, it might be time to consider professional help. Professional tile and grout cleaning services use specialized equipment, powerful yet safe cleaning solutions, and trained technicians to deliver a level of clean that is difficult, if not impossible, to achieve with household tools. They can tackle deep-seated stains, restore original grout colors, and provide a comprehensive clean that also contributes to a healthier indoor environment.
The Professional Albuquerque Expert Deep Grout Cleaning Process
Professional deep grout cleaning is a multi-step process that thoroughly cleans and restores your tiled surfaces. While specific procedures may vary slightly between companies, the core elements remain consistent, ensuring a deep and lasting clean.
- Pre-Inspection and Assessment: The process begins with a thorough inspection of your tile and grout. Technicians identify the type of tile (ceramic, porcelain, natural stone), the type of grout (sanded, non-sanded, epoxy), and the extent of the staining and damage. This assessment helps them select the most appropriate cleaning solutions and techniques to avoid damage and achieve optimal results.
- Pre-Treatment with pH-Balanced Solutions: A specialized, pH-balanced cleaning solution is applied to the tile and grout. Unlike many harsh DIY chemicals, these professional-grade solutions are formulated to break down dirt, grease, and grime effectively without harming the grout or tile. The solution is allowed a dwell time to penetrate the porous grout and loosen embedded soils.
- Mechanical Scrubbing: After the pre-treatment, the grout lines are agitated using specialized mechanical scrubbers or high-speed rotary brushes. This step is crucial for dislodging stubborn dirt and stains that have bonded with the grout over time. The mechanical action provides a level of scrubbing power far beyond what can be achieved manually.
- Hot Water Extraction: The cornerstone of professional deep grout cleaning. High-pressure, hot water is used to flush out the loosened dirt, grime, and cleaning solution from the grout lines and tile surface. Simultaneously, a powerful vacuum system extracts the dirty water, ensuring contaminants are removed from your home —not just pushed around. This hot-water extraction method is highly effective at sanitizing surfaces and removing a significant percentage of allergens.
- Targeted Stain Removal (if necessary): For stubborn spots or stains, technicians may apply targeted stain removers and use specific techniques to address them without damaging the surrounding areas.
- Post-Cleaning Inspection: Once the cleaning is complete, the technicians perform a final inspection with you to ensure your satisfaction with the results.
The Benefits of Professional Service for Albuquerque Expert Deep Grout Cleaning
Opting for professional deep grout cleaning offers numerous advantages beyond what DIY methods can provide.
- Deeper Clean and Uniform Results: Professional equipment and techniques reach deep into the grout’s pores, removing embedded dirt and grime that regular mopping or even vigorous scrubbing can miss. This results in a consistently clean and uniform appearance across all your tiled surfaces.
- Specialized Equipment: Professionals use powerful truck-mounted or portable hot-water extraction units, high-speed rotary scrubbers, and specialized tools to thoroughly and efficiently clean grout. This equipment is not typically available to the average homeowner and provides superior cleaning power.
- Time and Effort Savings: Deep cleaning grout is a laborious and time-consuming task. Hiring professionals frees up your valuable time and saves you from the physical strain of scrubbing on your hands and knees.
- Healthier Home Environment: As mentioned, grout can harbor allergens, bacteria, mold, and mildew. Professional cleaning, especially with hot water extraction, effectively removes these contaminants, contributing to a healthier indoor environment. Our tile and grout cleaning process removes an average of 96.5% of common household allergens, making a significant difference for allergy sufferers.
- Restoration of Appearance: Over time, grout can become discolored, making your entire tiled area look old and dirty. Professionals can often restore grout to its original color, revitalizing the look of your floors, showers, and countertops.
- Expertise and Knowledge: Trained technicians understand different tile and grout types and know which cleaning solutions and methods are safe and effective for each. This prevents potential damage that can occur from using incorrect products or techniques.
- Preparation for Sealing: Professional cleaning thoroughly cleans the grout, preparing it perfectly for sealing. A clean, dry surface is essential for a sealant to bond properly and provide maximum protection.
The Final Step: Protecting Your Grout for the Future
Once your grout is sparkling clean, whether from your diligent DIY efforts or a professional service, the job isn’t quite finished. To maintain that fresh look and prevent future grime from taking hold, protection and ongoing maintenance are key. This final step is crucial for extending the life of your clean grout and making future cleaning much easier.
The Power of Grout Sealing
Grout sealing is arguably the most important step after deep cleaning. Think of grout sealer as an invisible shield for your grout lines.
What is Grout Sealer? Grout sealer is a liquid solution, typically water-based or solvent-based, that penetrates the porous surface of cementitious grout. It fills the microscopic pores, creating a protective barrier that repels liquids and stains.
Benefits of Sealing:
- Stain Prevention: Sealed grout is significantly less likely to absorb spills from food, drinks, or soap scum, preventing them from penetrating and causing permanent stains. Instead, liquids bead up on the surface, making cleanup easy.
- Moisture Repellency: In moisture-prone areas like bathrooms and kitchens, sealing helps repel water, which in turn inhibits the growth of mold, mildew, and bacteria within the grout lines.
- Easier Cleaning: Because dirt and grime can’t penetrate deeply into sealed grout, routine cleaning is much simpler. A quick wipe or mop is often all that’s needed to keep surfaces clean.
- Longevity of Grout: By protecting against moisture and staining, sealing helps preserve the structural integrity and appearance of your grout, extending its lifespan.
Application Process:
- Ensure Grout is Clean and Dry: This is paramount. Any dirt or moisture trapped under the sealer will be locked in. Allow at least 24-48 hours after cleaning for the grout to fully dry.
- Test for Porosity: To check if your grout needs sealing or if an existing sealer is still effective, place a few drops of water on an inconspicuous area. If the water quickly absorbs and darkens the grout, it needs to be sealed. If it beads up, the sealer is still working.
- Apply the Sealer: Follow the manufacturer’s instructions carefully. Typically, you’ll apply the sealer evenly along the grout lines using a small brush, roller, or applicator bottle. For DIY-friendly options, products like 511 Impregnator Sealer are often recommended for their ease of use.
- Wipe Off Excess: After a specified dwell time (usually 5-15 minutes), wipe off any excess sealer from the tile surface with a clean microfiber cloth. Do not let the sealer dry on the tile, as it can leave a hazy residue.
- Drying Time: Allow the sealer to cure for the recommended period —often 24-72 hours —before exposing it to moisture or heavy traffic. Some sealers may require multiple coats.
Grout sealants typically last anywhere from 1 to 5 years, depending on the product, traffic, and cleaning habits. Regular reapplication is necessary to maintain protection.
Simple Maintenance Habits for Lasting Cleanliness
Beyond sealing, adopting a few simple maintenance habits can significantly prolong the cleanliness of your grout and reduce the need for frequent deep cleaning.
- Regular Sweeping or Vacuuming: Dry soil is easier to remove than wet soil. Regularly sweep or vacuum your tiled floors to pick up loose dirt, dust, and debris before it has a chance to settle into the grout lines.
- Use pH-Neutral Cleaners for Routine Cleaning: For daily or weekly cleaning, opt for pH-neutral floor cleaners. Products like Mr. Clean Multipurpose are a safe bet as they effectively clean without degrading your grout or sealer. Avoid strong acids, alkalis, or abrasive cleaners, as they can strip sealants and damage grout over time.
- Immediate Spill Cleanup: Address spills promptly. The longer a spill sits, especially on unsealed or poorly sealed grout, the more likely it is to penetrate and cause a stain. Blot, don’t rub, to lift the spill.
- Squeegee for Showers: After each shower, use a squeegee on tiled walls and shower floors. This removes excess water, soap scum, and shampoo residue, which are common culprits for mold and mildew growth in grout.
- Routine Mopping with Clean Water: When mopping floors, use a two-bucket system (one for cleaning solution, one for rinse water) to avoid spreading dirty water. Change the rinse water frequently. For best results, use a microfiber mop head, which is highly effective at picking up grime.
- Ventilation: In bathrooms, ensure good ventilation during and after showers by using an exhaust fan or opening a window. This helps dry out the environment, discouraging mold and mildew growth in grout.
By combining the protective power of grout sealing with consistent, gentle maintenance, you can enjoy beautiful, clean grout for years to come, minimizing the effort required for deep cleaning.
Frequently Asked Questions about Deep Grout Cleaning
How often should I deep clean my grout?
The frequency of deep grout cleaning largely depends on the area and its usage. For high-traffic areas like kitchen floors, entryways, and bathrooms, we recommend deep-cleaning grout 1-2 times per year. These areas accumulate dirt, grease, and moisture more rapidly. In low-traffic areas such as guest bathrooms or utility rooms, deep cleaning may only be needed every 2-3 years. Visual inspection is your best guide: if your grout looks discolored, dingy, or has visible mold/mildew, it’s time for a deep clean. Regular maintenance, including sweeping and using pH-neutral cleaners, can extend the time between deep cleaning sessions.
Can I use a steam cleaner on my grout?
Yes, steam cleaners can be an excellent tool for cleaning grout, but with some considerations. Benefits:
- Chemical-Free: Steam cleaning uses only water, making it an environmentally friendly option and safe for homes with children or pets.
- High-Heat Sanitation: The high temperature of the steam effectively loosens dirt, grime, and soap scum, and also sanitizes the grout, killing bacteria, mold, and mildew.
- Reduced Scrubbing: For many stains, steam can significantly reduce the amount of manual scrubbing required. Cautions:
- Not for All Tile Types: While generally safe for most ceramic and porcelain tiles, exercise caution with certain natural stone tiles (such as marble or limestone) or older, delicate tiles, as intense heat may cause damage or affect existing sealants.
- Risk of Damage: Excessive steam applied directly to compromised or unsealed grout for too long can weaken it. Always move the steam cleaner steadily.
- Professional vs. Home Units: Professional-grade steam cleaners offer higher heat and pressure, providing a more thorough clean than typical consumer-grade handheld units. If you have extensive or heavily soiled grout, a professional service might use more robust steam-cleaning techniques. When using a home steam cleaner, always test in an inconspicuous area first and ensure proper ventilation.
Is it safe to use Bleach on grout?
While Bleachhh is a powerful disinfectant and can whiten surfaces, we generally do not recommend using Bleachhh on grout, especially cement-based grout. Bleach Risks:
- Grout Erosion: Bleach is a strong oxidizer. Over time, it can chemically degrade the cementitious binders in grout, making it porous, brittle, and more prone to crumbling and future staining.
- Sealant Damage: If your grout is sealed, Bleachh will degrade and strip away the sealant, leaving your grout unprotected.
- Discoloration of Colored Grout: Bleach will inevitably lighten or completely strip the color from colored grout, resulting in an uneven, unsightly appearance.
- Health Hazards: Bleach fumes can irritate the respiratory system, and mixing bleach with other cleaners (such as ammonia or acids) can create dangerous, toxic gases. Safer Alternatives: Instead of bleach, opt for:
- pH-Neutral Cleaners: For routine cleaning, these are gentle on grout and sealants.
- Oxygenated Cleaners: Products containing hydrogen peroxide or oxygen bleach are excellent for brightening grout and tackling stains without the harshness of chlorine bleach. They are color-safe and won’t damage grout integrity.
- Specialized Grout Cleaners: Many commercial grout cleaners are formulated to be effective without bleach and are specifically designed to be safe for grout and tile. If you must use Bleach for a specific, localized, and stubborn mold issue, dilute it heavily, apply it sparingly, ensure excellent ventilation, and rinse thoroughly immediately after a short dwell time. However, it’s always best to choose a safer alternative.
Conclusion
Our journey through deep grout cleaning highlights a fundamental truth: grout, with its porous nature, is a silent collector of grime, allergens, and moisture. Understanding this characteristic is the first step toward effective maintenance. We’ve explored the efficacy of DIY methods, particularly the powerful combination of baking soda and hydrogen peroxide, offering a cost-effective way to tackle many common grout issues. However, we also recognize the limitations of household solutions. For deep-seated stains, extensive areas, or when time and effort are at a premium, professional services offer an unparalleled level of cleanliness. Using specialized equipment and techniques such as hot water extraction, professionals not only restore your grout’s appearance but also contribute significantly to a healthier home environment by removing a high percentage of common household allergens. The key to lasting grout cleanliness lies in a two-pronged approach: diligent deep cleaning, whether DIY or professional, followed by crucial preventative measures. Sealing your grout creates a protective barrier against future stains and moisture, while simple, consistent maintenance habits keep the grime at bay. By embracing these strategies, you can say goodbye to dingy, discolored grout and enjoy the pristine beauty of your tiled surfaces for years to come.