
Introduction: The Silent Threat in Your Home
Imagine your home as your haven. But what if a silent, unwelcome guest was growing within its walls? You might have spotted dark patches on a wall, perhaps after some water damage, or noticed a persistent musty odor that won’t go away. This could be black mold, and the thought of it often raises concerns about our health and property safety.
Black mold is more than just an unsightly stain. It thrives in damp environments and can signal hidden moisture issues that need immediate attention. Mold can spread rapidly, sometimes within 24 to 48 hours, turning a minor problem into a big one. Our infographic shows how quickly mold can take hold, changing a damp spot into a widespread issue over days or weeks.
We understand the worry and confusion that black mold can cause. That’s why we’ve created this ultimate guide. We aim to empower you with clear, actionable steps to safely identify, remediate, and prevent black mold in your home. We’ll explore the health risks, necessary safety precautions, and detailed cleaning methods for different surfaces. We will also help you understand when it’s time to call in the professionals to ensure a healthy living environment for everyone.
Understanding Black Mold: Identification, Causes, and Health Risks
When people refer to “black mold,” they often mean Stachybotrys chartarum, a specific type of mold known for its greenish-black appearance and slimy texture when wet. However, it’s crucial to understand that many types of mold can appear black, and not all black molds are Stachybotrys. Regardless of the species, mold growth in your home indicates a moisture problem and should be addressed promptly.
Visual signs of mold can range from small, fuzzy patches to widespread discoloration. It frequently emits a distinct, musty odor, often leading to its finding even before it’s visible. Common areas for black mold growth include basements, bathrooms, kitchens, and areas around windows or leaky pipes. These locations provide the ideal conditions for mold: moisture, an organic food source, and warmth.
What Causes Black Mold to Grow?
Mold spores are ubiquitous; they are naturally present in the air both indoors and outdoors. However, they only begin to grow and colonize when they find the right conditions. The primary catalyst for mold growth is moisture. This can stem from various sources:
- Plumbing Leaks: Even small, undetected drips from pipes, faucets, or appliances can create consistently damp conditions behind walls or under floors.
- High Humidity: Indoor humidity levels consistently above 50% provide enough moisture in the air for mold to settle and grow on surfaces, especially in poorly ventilated areas.
- Condensation: Cold surfaces like windows, pipes, or uninsulated walls can accumulate condensation, leading to moisture buildup.
- Flooding: Major water intrusions from floods, burst pipes, or sewage backups provide an immediate and extensive water source, allowing mold to spread rapidly.
- Poor Ventilation: Areas without adequate airflow, such as crawl spaces, attics, or bathrooms without exhaust fans, trap moisture, creating a breeding ground for mold.
- Organic Food Source: Mold feeds on organic materials rich in cellulose, which are abundant in our homes. These include drywall, wood, insulation, wallpaper, carpet, and even dust.
Given these conditions, mold can begin to colonize in as little as 24 to 48 hours after a moisture event. The longer the moisture problem persists, the more deeply rooted the mold growth becomes.
The Health Dangers of Black Mold Exposure
While the color of mold doesn’t dictate its danger, all molds can potentially cause health issues, particularly for sensitive individuals. Stachybotrys chartarum is often highlighted because it can produce mycotoxins, toxic compounds that can become airborne with the mold spores. Exposure to these mycotoxins can lead to a range of symptoms, from mild allergic reactions to more severe health problems.
Common symptoms of mold exposure include:
- Allergic Reactions: Sneezing, coughing, runny nose, itchy eyes, skin rashes, and hives.
- Respiratory Problems include wheezing, shortness of breath, asthma attacks (especially for individuals with pre-existing asthma), and other respiratory irritations.
- Neurological Symptoms: Headaches, fatigue, brain fog, and dizziness, though these are less common and often associated with prolonged or high-level exposure.
- Other Symptoms: Sore throat, nasal congestion, and eye irritation.
Individuals with compromised immune systems, chronic respiratory diseases (like asthma or COPD), or mold allergies are particularly at risk and may experience more severe or persistent symptoms. Children and older people can also be more vulnerable. If you suspect health issues are linked to mold exposure, it’s advisable to consult a healthcare professional. For more detailed information on the health effects of mold, refer to resources like the CDC on Mold & Health.
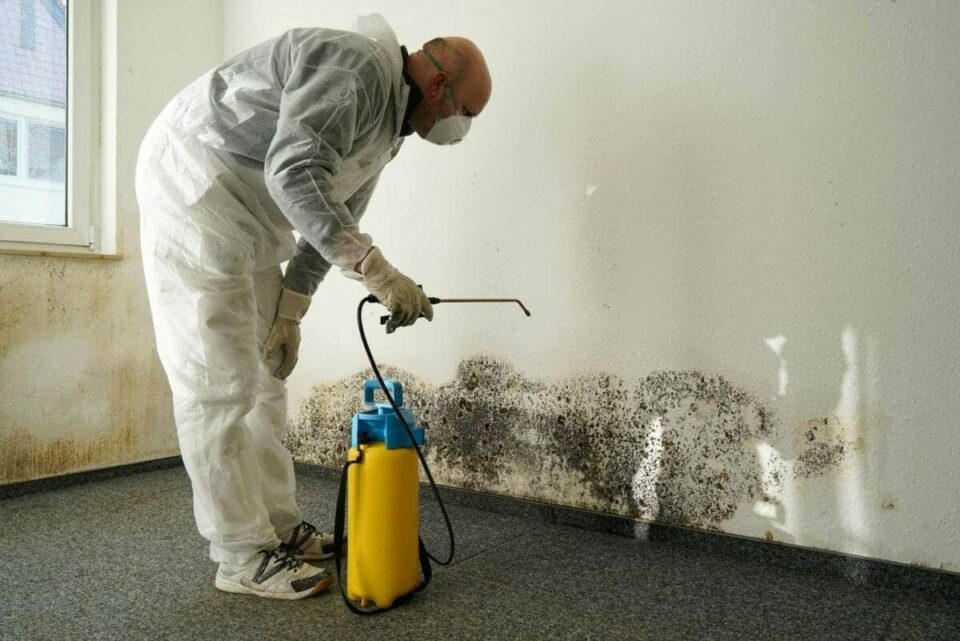
Preparing for Remediation: Containment and Personal Safety
Before you even consider touching mold, safety must be your top priority. Mold spores are microscopic and easily become airborne when disturbed, spreading to other areas of your home and potentially exacerbating health issues. Proper preparation and personal protective equipment (PPE) are non-negotiable steps in mold remediation.
Preventing Spore Spread (Containment):
Containment is crucial for any mold remediation project, especially those larger than a few square inches. This involves isolating the affected area to prevent spores from contaminating other parts of your home.
- Seal Off the Area: Use heavy-duty plastic sheeting (at least 6-mil thick) and painter’s tape to seal off doorways, windows, and any other openings leading out of the contaminated space. This creates a barrier against airborne spores.
- Turn Off HVAC: Disable your heating, ventilation, and air conditioning (HVAC) system to prevent the circulation of mold spores throughout your home. If the HVAC system is contaminated, it will require specialized cleaning (more on this later).
- Create Negative Air Pressure (Professional Only): Professionals often use specialized equipment called negative air machines (air scrubbers) to create negative air pressure within the containment zone. This ensures that airborne spores are drawn into the machine’s HEPA filters and not pushed out into clean areas. For DIY, ensuring good ventilation to the outside (e.g., an exhaust fan venting out a window) can help, but it’s not a substitute for professional negative air pressure.
Essential Personal Protective Equipment (PPE)
Protecting yourself from direct contact and inhalation of mold spores is paramount. Always wear the following PPE:
- NIOSH-Approved N95 Respirator: This mask is designed to filter out at least 95% of airborne particles, including mold spores. Ensure it fits snugly over your nose and mouth. For larger jobs, a P100 respirator offers even greater protection.
- Safety Goggles: Choose goggles that create a seal around your eyes to prevent airborne spores from causing irritation or infection. Standard safety glasses with open sides are not sufficient.
- Long Rubber Gloves: Heavy-duty rubber gloves (like dishwashing gloves) protect your hands from mold and cleaning solutions. Disposable gloves can be worn underneath for easier cleanup.
- Disposable Full-Body Coveralls: These prevent mold spores from settling on your clothes and skin, which could then be tracked into other areas of your home. Disposable coveralls should be sealed at the wrists and ankles.
- Head Covering: A disposable hood or cap can protect your hair from spores.
- Boot Covers: Disposable boot covers prevent tracking mold into unaffected areas.
Never reuse PPE, especially respirators or disposable coveralls, after working in a moldy environment. Dispose of contaminated PPE properly after each use.
The Remediation Process: A Step-by-Step Guide
Once you’ve safely prepared the area and donned your PPE, you can begin mold remediation. The approach will vary depending on the type of surface affected and the extent of the growth, but the core principle remains: remove the mold, clean the surface, and thoroughly dry it.
Recommended Cleaning Solutions:
- Detergent and Water: A simple solution of household detergent (like dish soap) and water is highly effective for most hard, non-porous surfaces. Scrubbing physically removes the mold.
- White Vinegar Solution: Undiluted white vinegar is a mild acid that can kill many types of mold. Spray it directly onto the mold, let it sit for an hour, then scrub and rinse.
- Commercial Mold Cleaners: Various commercial products are formulated to kill mold and mildew. Always follow the manufacturer’s instructions carefully and ensure the area is well-ventilated.
- Avoiding Bleach on Porous Surfaces: While bleach can kill mold on hard, non-porous surfaces, it’s generally not recommended for porous materials. Bleach primarily disinfects the surface, but the mold’s hyphae (roots) can remain embedded, and bleach’s water content can feed future mold growth. Never mix bleach with ammonia or other cleaners; this can create toxic fumes.
Cleaning Mold from Hard, Non-Porous Surfaces
Hard, non-porous surfaces like tile, glass, metal, and sealed concrete are generally easier to clean because mold cannot penetrate them deeply.
- Spray the Mold: Lightly mist the moldy area with water to prevent spores from becoming airborne during scrubbing.
- Apply Cleaning Solution: Directly spray or apply your chosen cleaning solution (detergent and water, vinegar, or commercial cleaner) onto the mold.
- Scrub Thoroughly: Vigorously scrub the mold away using a stiff brush or scrubbing sponge. Ensure you remove all visible traces.
- Rinse and Dry: Rinse the area with clean water and thoroughly dry the surface. This is a critical step; remaining moisture can lead to mold regrowth. Use fans, dehumidifiers, or even a hairdryer to ensure complete dryness.
- Preventing Regrowth: After cleaning and drying, consider applying a mold-inhibiting primer or sealant if appropriate for the surface, especially in damp areas.
Handling Mold on Porous Materials
Porous materials, such as drywall, wood, carpet, upholstery, and insulation, present a greater challenge because mold can grow deep within their structure. Often, these materials cannot be effectively cleaned and must be removed and discarded.
- Drywall and Insulation: Moldy drywall or insulation almost always needs to be removed and disposed of. Mold roots can extend far beyond the visible surface.
- Carpet and Padding: Moldy carpet and padding should be removed and discarded. It’s nearly impossible to remove mold completely from these materials, and attempting to do so can release massive amounts of spores.
- Wood Cleaning: You might be able to clean surface mold on solid wood (like framing or subflooring). After cleaning with a mold solution, you may need to lightly sand the surface to remove any remaining embedded mold or staining. Once clean and dry, consider applying a mold-resistant sealant to the wood.
- When to Discard Items: Generally, if a porous item is heavily saturated with mold or has been wet for more than 48 hours, it’s usually best to discard it. This includes books, clothing, furniture, and other absorbent materials.
- Risks of Painting Over Mold: Never paint or caulk over moldy surfaces without thoroughly cleaning and drying them. Painting over mold will not kill it; it will continue to grow beneath the paint, eventually causing the paint to peel and the problem to worsen. For more comprehensive guides on mold removal, including specific techniques for different surfaces, you can consult resources like How to Get Rid of Black Mold.
DIY vs. Professional: When to Call for Emergency Black Mold Remediation
Deciding whether to tackle mold remediation yourself or hire professionals is a critical decision that depends on several factors, including the size of the affected area, the type of material, and your personal health.
Feature DIY Mold Remediation (Small Areas) Professional Mold Remediation Scope Less than 10 square feet (e.g., a small patch on a wall) Over 10 square feet, hidden mold, extensive water damage, sewage backup Cost Low (materials, PPE) Moderate to high (equipment, labor, specialized services) Safety Requires strict adherence to PPE and containment for personal safety Trained technicians, specialized PPE, advanced containment (negative air) Effectiveness Sufficient for surface mold on non-porous materials Comprehensive removal, addressing hidden mold, preventing recurrence Equipment Basic cleaning supplies, scrub brushes, fans, dehumidifiers HEPA vacuums, air scrubbers, moisture meters, thermal cameras, industrial drying equipment, antimicrobial treatments Certification None required IICRC certified technicians, adherence to industry standards The DIY Approach for Small, Contained Areas
You can typically handle mold cleanup if the affected area is relatively small—generally less than 10 square feet (roughly a three-foot by three-foot patch). This applies to surface mold on hard, non-porous materials where you can easily see and access the entire growth.
Key considerations for DIY:
- Size Matters: Stick to the 10-square-foot rule. If it’s larger or if you suspect hidden mold, call a professional.
- Non-Toxic Mold (Assumed): While you should treat all mold cautiously, DIY is generally for common household molds, not situations involving sewage or other contaminated water.
- Safety Precautions: Always wear full PPE as described above.
- Proper Disposal: Place all moldy materials in sealed heavy-duty plastic bags and dispose of them according to local regulations.
- When to Stop and Call a Pro: If the mold reappears quickly, if you start experiencing health symptoms, if the area is larger than expected, or if you find mold in hard-to-reach places (like inside walls), stop immediately and seek professional help.
Why Professional Emergency Black Mold Remediation is Often Necessary
For larger infestations, hidden mold, or situations involving significant water damage, professional remediation is not just recommended, it’s often essential. Professionals bring expertise, specialized equipment, and adherence to industry standards that DIY efforts cannot match.
- Large-Scale Infestations: Mold covering more than 10 square feet is beyond the scope of safe DIY cleanup. Professionals have the resources to contain and remove large amounts of mold without contaminating the rest of your property.
- Hidden Mold: Mold often grows behind walls, under flooring, or in HVAC systems, where it’s not visible. Professionals use moisture meters, thermal cameras, and their experience to detect hidden mold and address the root cause.
- Structural Integrity Concerns: Extensive mold can compromise the structural integrity of your home. Professionals can assess this damage and coordinate necessary repairs.
- Health Sensitivities: If anyone in your household has pre-existing health conditions, allergies, or a compromised immune system, professional remediation minimizes exposure risks.
- Post-Remediation Verification: Reputable professionals often offer post-remediation testing to ensure the mold has been effectively removed and the air quality is safe.
For widespread issues that require a certified team, professional Octagon emergency black mold remediation services ensure adherence to safety standards and effective removal. They understand the complexities of mold growth and removal, providing a thorough job that protects your health and property.
Handling Special Cases That Require Emergency Black Mold Remediation
Certain situations demand immediate professional intervention due to heightened health risks and complex remediation procedures:
- Sewage Contamination (Black Water): If mold growth results from sewage or “black water” (water from toilets containing fecal matter), it’s a biohazard. This type of water contains harmful bacteria, viruses, and other pathogens besides mold. Attempting DIY cleanup in these situations is extremely dangerous and could lead to severe illness.
- HVAC System Contamination: If you suspect mold in your heating, ventilation, and air conditioning (HVAC) system, do not run it. Mold spores can be circulated throughout your entire home, spreading the contamination. Cleaning HVAC systems requires specialized knowledge and equipment to ensure all ducts are thoroughly cleaned and disinfected without spreading spores. The EPA provides guidance on this; consult the EPA guide on air duct cleaning before taking action if you suspect your system is contaminated.
In these emergency scenarios, the risks associated with DIY cleanup far outweigh any potential cost savings. Professionals are equipped to handle hazardous materials, prevent cross-contamination, and restore your home safely.
Preventing Future Mold Growth: The Key is Moisture Control
The most effective way to prevent mold from returning after remediation is to address the underlying moisture issues that allowed it to grow in the first place. Mold cannot thrive without moisture, so controlling water sources and humidity is paramount.
Key Strategies for Proactive Prevention:
- Fix Leaks Promptly: This is the golden rule of mold prevention. Regularly inspect plumbing, roofs, windows, and appliance hoses for leaks. Repair any drips or moisture intrusions immediately, no matter how small they seem.
- Control Indoor Humidity: Aim to keep indoor humidity levels below 50%, ideally between 30% and 45%. Use a hygrometer to monitor humidity.
- Dehumidifiers: Essential in damp areas like basements, crawl spaces, and bathrooms, especially during humid seasons.
- Air Conditioners Can help reduce humidity in warmer months.
- Improve Ventilation: Exhaust Fans: Install and use exhaust fans in bathrooms and kitchens to vent moisture outside. Run bathroom fans for at least 30 minutes after showering.
- Open Windows: When the weather permits, open windows to increase airflow and reduce indoor humidity.
- Crawl Space and Attic Ventilation: Ensure these areas are properly vented to prevent moisture buildup.
- Dry Wet Areas Immediately: After any water event—a spill, a leak, or condensation—dry the affected area within 24-48 hours. Use fans, dehumidifiers, and open windows to speed up drying.
- Regular Inspections: Periodically check areas prone to moisture and mold growth:
- Basements: Look for leaks, dampness on walls, and musty odors.
- Attics: Check for roof leaks, condensation on insulation, and proper ventilation.
- Crawl Spaces: Inspect for standing water, leaky pipes, and damp soil.
- Around Windows and Doors: Look for condensation and seal any gaps or cracks.
- Clean Gutters and Downspouts: Ensure they are clear and direct water away from your home’s foundation.
- Proper Landscaping: Slope the ground away from your foundation to prevent water from pooling near your home.
By proactively managing moisture, you create an environment where mold cannot thrive, safeguarding your home and your health for the long term.
Frequently Asked Questions about Black Mold Remediation
We often encounter common questions and misconceptions about black mold. Here, we address some of the most frequent inquiries to provide clarity and empower you with accurate information.
How can you tell if it’s toxic black mold?
The truth is, you generally cannot tell if mold is “toxic black mold” (Stachybotrys chartarum) just by looking at it. Many types of mold can appear black, dark green, or brownish. Visual identification alone is unreliable for determining the species or potential health risks.
Our recommendation: Treat all mold growth as a potential health risk. If you see or smell mold, assume it needs to be removed safely. Professional testing can confirm the species of mold. Still, the EPA and CDC often advise that if mold is present, it should be removed, regardless of its type, as all molds can cause health issues for sensitive individuals.
How long does it take to get sick from mold exposure?
The time it takes to experience symptoms from mold exposure varies significantly from person to person. It depends on several factors:
- Individual Sensitivity: Some people are highly sensitive to mold and may develop symptoms within hours of exposure, while others might have no noticeable reaction at all.
- Type of Mold: Certain mold species may trigger reactions more quickly or severely than others.
- Duration and Level of Exposure: Short-term exposure to a small amount of mold might cause mild, temporary symptoms. In contrast, prolonged exposure to high concentrations can lead to more chronic or severe health problems.
- Pre-existing Conditions: Individuals with allergies, asthma, or compromised immune systems are more likely to react quickly and severely.
Symptoms can range from immediate allergic reactions (sneezing, coughing) to more gradual onset of fatigue, headaches, or respiratory issues that develop over days or weeks of continuous exposure. If you suspect mold exposure affects your health, consult a medical professional.
Will bleach kill black mold?
Bleach is a strong disinfectant and can kill mold on hard, non-porous surfaces like tile, glass, or countertops. However, its effectiveness is limited, and it comes with several caveats:
- Ineffective on Porous Materials: Bleach does not penetrate porous materials like wood, drywall, or fabric. While it may kill surface mold, its roots (hyphae) can remain embedded, allowing it to regrow. The water content in bleach can even provide additional moisture that feeds mold growth.
- Safety Hazards: Bleach produces harsh fumes and can irritate skin, eyes, and respiratory passages. It should always be used in a well-ventilated area. Never mix bleach with ammonia or other household cleaners, as this can create highly toxic chlorine gas.
- Discoloration: Bleach can discolor or damage certain materials.
For mold remediation, especially on porous surfaces, using a detergent and water solution, white vinegar, or commercial mold cleaners specifically designed for mold removal is generally more effective. The most crucial step is always to remove the mold and ensure the area is dry physically.